Limbic Media is entering its busiest season yet. Aurora-powered LED installations are going up around the world for the 2018 holiday season and beyond.
Aurora controls LED displays by interpreting sound and mapping that audio data into lighting design. While Aurora handles interpreting and mapping the subtleties of audio data, installers have the power of manipulating lighting design features through the Aurora Mobile App. This article guides you through how to create a holiday light show with Aurora for the 2018 holiday season using the Mobile App.

Aurora Singing Tree, Victoria, BC
The Aurora Mobile App offers a library of patterns, color palettes, and parameters to give users easy yet sophisticated light show customization. The App currently contains 9 patterns—the foundation of Aurora lighting design. Each pattern uniquely analyzes incoming audio data and maps it into specific lighting behavior. The App also contains 4 parameter sliders to adjust the speed, energy, variance, and decay of patterns. Parameters affect each pattern slightly differently, so we encourage experimenting with different combinations. Aurora also contains 24 color palettes.
Combining the patterns, parameters, and palettes give users thousands of design possibilities with no lighting design expertise required. These possibilities will only grow with continuous pattern, palette, and Mobile App development. Here’s how to create an effective holiday light show.https://player.vimeo.com/video/266534117?app_id=122963
Step 1: Calibrate your audio input
To create a light show that intuitively reflects audio input, users must calibrate audio-reactive Aurora installations. Users can calibrate audio input in two ways—with auto gain or manual gain—depending on the audio input type. For example, an outdoor installation that responds to public interaction via microphone should be calibrated differently than an installation with an audio player or professional audio equipment plugged directly into Aurora.
Calibrate Aurora for music
Aurora installations that respond to music plugged directly into Aurora are most effective when calibrated for auto gain. This means that Aurora automatically creates light shows that are consistently responsive, no matter the volume level. If a song goes from extremely loud to very quiet, for example, the lighting design will reflect these dynamics, but not disappear completely.
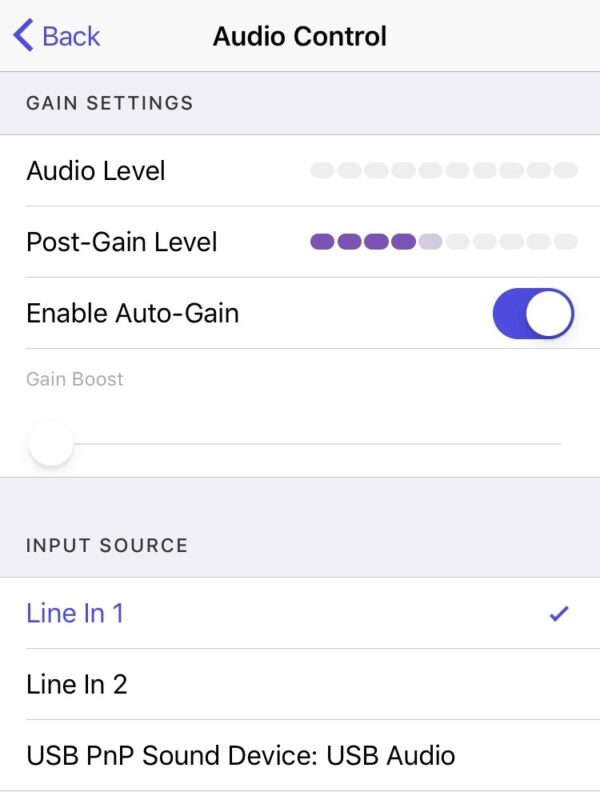
To enable Auto Gain, ensure that you are connected to an Aurora installation via the Aurora Mobile App. Navigate to Device Settings > Audio Control. Select the appropriate input source, and enable Auto Gain:
Aurora Mobile App – Auto-Gain enabled
Next, adjust the level of your audio source—this could be the music volume coming from your mobile device or a professional DJ booth. Aim for the loudest sound to turn the audio select status LED (SEL) on the front of your Aurora controller yellow:
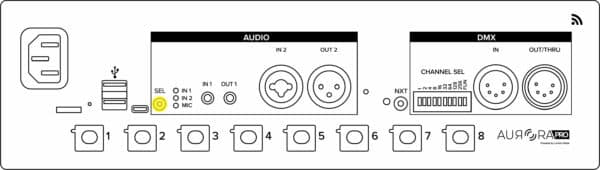
Aurora Pro Connector Interface – Audio Select Status LED (SEL) Illuminated
Calibrate Aurora for audience interaction
Aurora installations often use a USB microphone as audio input. This is popular for public spaces and holiday events, encouraging passers-by to engage with lighting design through their voices, claps, and other interactions.
These open environments used with a microphone tend to vary in audio levels and the frequency or intensity of audience interaction. This is not ideal for auto gain. For example, auto-gain allows Aurora to capture a sudden audio interaction (a clap or a loud voice) effectively—but automatically normalizes to that sound, leaving a follow-up interaction not as noticeable in contrast.
In these situations, you should use manual gain. This gives installers full control over how loud audio must be for Aurora to noticeably react. To enable manual gain, ensure that you are connected to an Aurora installation via the Aurora Mobile App. Navigate to Device Settings > Audio Control. Select the appropriate input source, and disable Auto Gain:

Aurora Mobile App – Manual Gain enabled
Adjust the Gain Boost slider until Aurora reacts to the desired level of audio input.
Step 2: Explore Aurora’s holiday color palettes
The color palettes available in the Aurora Mobile App are developed by Limbic Media’s creative team. The palette gradients are specifically designed to produce aesthetic light shows that look like they were created by a professional lighting designer. Custom color palettes, such as corporate colors for holiday events, can also be created on request—contact Limbic Media for more information.
For textbook holiday red/green shows, installers can choose from two red/green palettes:

Christmas

Red + Green = Yellow
There are also cool color palettes that work well for evoking wintery weather:

Off White

Winter

Cool White
All White
Warmer palettes are available for holiday installations aiming for a more traditional holiday look (think golds and blues):

Warm Yellow

Crest

Hot Coals

Sunrise

Royal
Step 3: Design a light show
Once you’ve calibrated your audio input and explored color palettes, you’re ready to dive into the fun part—creating light shows. Here’s how to use Show Mode or Live Control Mode in the Aurora Mobile App, as well as customize some holiday-themed patterns.
Use Show Mode or Live Control Mode
Users can operate Aurora lighting design in Show Mode or Live Control Mode under Device Control.
Live Control Mode allows you to adjust lighting patterns, palettes, and parameters in real-time in response to audio:
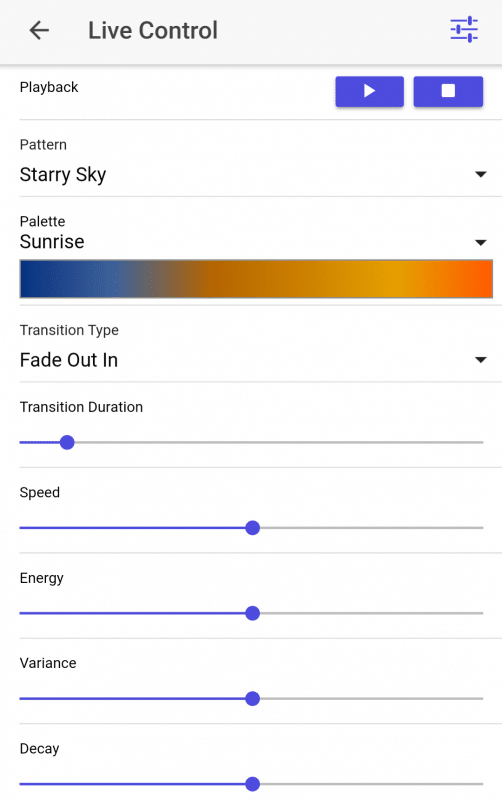
Aurora Mobile App – Live Control Mode
Show Mode allows you to create a sequence of predefined lighting pattern, palette, and parameter settings (cues). These cues play in sequence at specified time intervals. This helps add variation to a synchronized sound-to-light show. Ensure that preview is enabled while you’re adjusting cue settings:
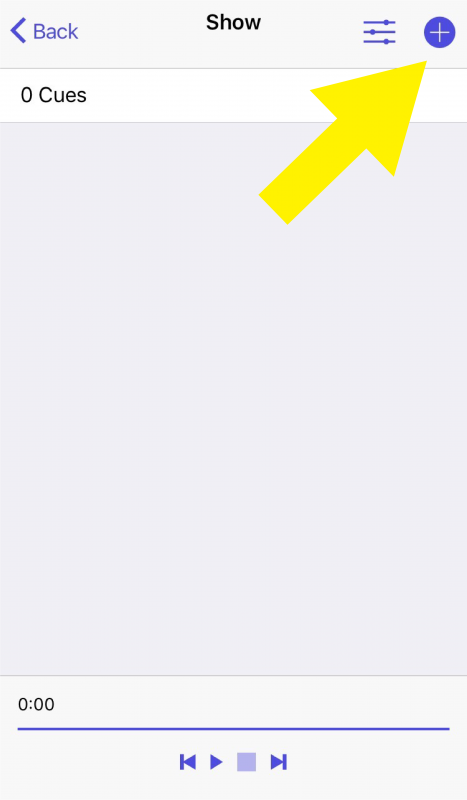
Step 1 – Add a new cue![]()
Aurora Mobile App – New Cue Screen. Turn Preview ON!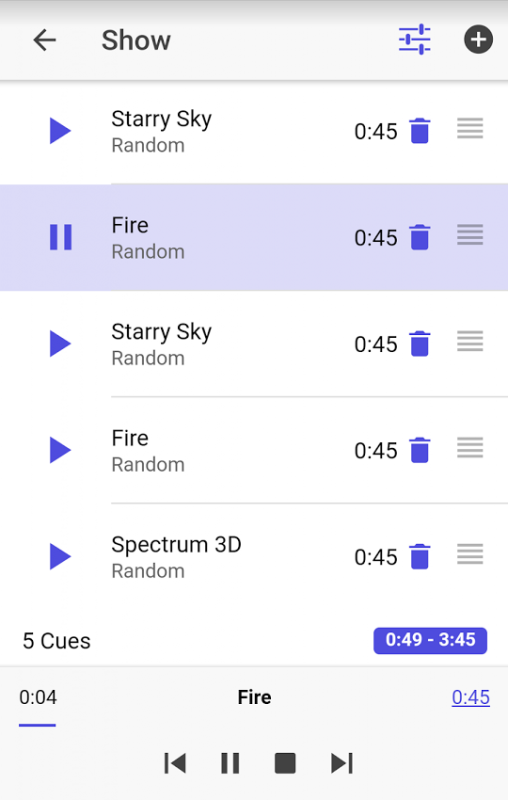
Step 3 – Show Mode with multiple cues
The Aurora Mobile App V1.5 also has a silence-detection feature for Show Mode, which automatically moves to the next cue when silence is detected. This is useful with song playlists, adding further variation between songs or after a musical pause. Enable the Advance Cue on Silence feature under Global Settings > Show Settings:
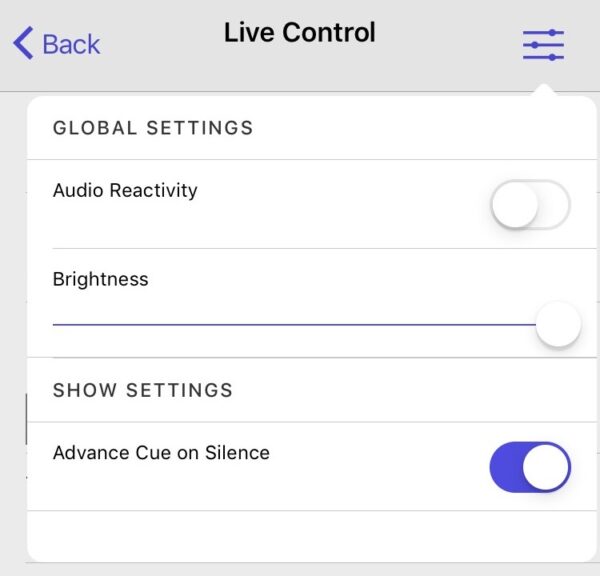
Aurora Mobile App – Advance Cue on Silence Enabled (App V1.5 or higher)
Create Holiday Patterns
Here are a few of our favorite holiday-themed patterns to create in Live Mode or Show Mode. Keep in mind that some of these patterns only work when arranged in a light grid, such as an LED curtain, canopy, or 3D cube. Installations without lights arranged in a grid (Singing Trees, for example) can be custom-mapped to better evoke 2D or 3D effects. Contact Limbic Media for details.
Snowflake
Capture subtle audio features through the intricate patterns of a snowflake. This effect is ideal for LED curtains or canopies that are mapped in a grid. Start with Twinkle as your pattern, a medium-high to high speed, medium energy, high variance, and low decay. Experiment with these lighting parameters to create the special snowflake you’re after:

Aurora Mobile App – “Snowflake” settings
Twinkling Stars
Create your own Christmas stars with Aurora’s Twinkle pattern. The twinkling star effect looks great with both cool and warm color palettes, as well as installations without lights arranged in a grid, such as Singing Trees.
The Twinkle pattern is based on the same pattern and parameter settings as a Snowflake—except with lowered speed. In the Twinkle pattern, a heightened speed affects the light arrangement of the lighting design, resulting in a snowflake-like shape.
Christmas Ball
Aurora’s Plasma pattern creates a moving Christmas ball or ornament, ideal for grid-mapped installations. Select Plasma as the pattern with low speed, high energy, low variance, and medium-low decay. Increasing the speed will affect the “bounciness” or movement of the ball:
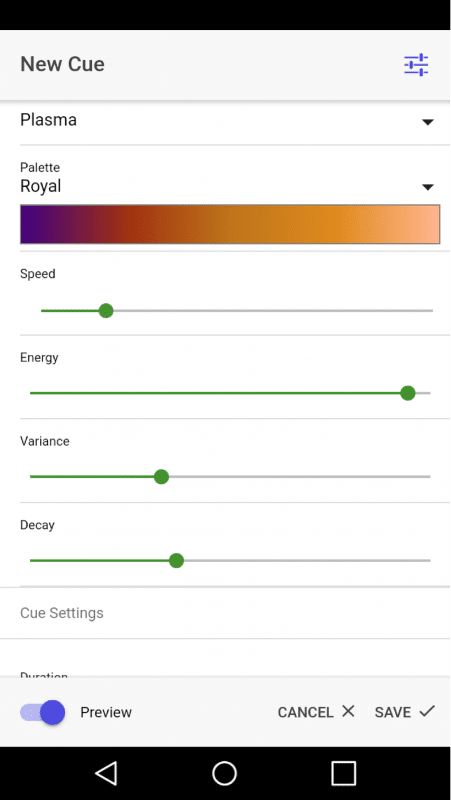
Aurora Mobile App – “Christmas Ball” settings
These are just a few of the suggested lighting design combinations for holiday-themed installations. We recommend playing around with different palette, pattern, and parameter combinations to reinvent your traditional holiday lighting displays.
Contact Limbic Media for more ideas and lighting design support—we will be releasing the Aurora Pro Manual in the next week for a full description of Aurora patterns and parameter functions.